The Funeral Problem

Sepia desert banner with a tumbleweed made of tangled cables. Bold text “What Could Possibly Go Wrong?” runs almost to the edge — a fitting metaphor for church systems that nearly work until they don’t.

Nothing tests a church’s technology like a funeral.

On a normal Sunday, the PowerPoint might freeze or the sound might squeal, and everyone sighs and carries on.  But at a funeral, the grieving family’s cousin turns up with a USB stick, the funeral director wants a tribute video right now, and the operator’s prayer is simple: Lord, let HDMI be merciful today.

The Funeral Problem Defined

“The Funeral Problem” is shorthand for any big, emotional service where the usual church systems are asked to cope with outsiders and surprises.  Weddings, carol services, school prizegivings — they all bring the same pressure.  But funerals are the clearest example: high emotion, high expectation, and no time for fixing cables.

And here’s the catch: what feels “good enough” on Sunday morning often falls apart when the funeral arrives.

Two Faces of the Problem

Sometimes, the outsider makes it work.  A cable gets rerouted, a bit of software is installed, or a laptop is plugged in directly.  The funeral runs smoothly, everyone is thankful — but by Sunday the volunteers are left with a mess.  The confidence monitor has vanished, the livestream no longer talks to the projector, and nobody knows what’s been changed.

Other times, it doesn’t work at all.  The slideshow won’t open, the sound cuts out, the video freezes.  And instead of quiet dignity, the room fills with stress.  Families remember the tribute that never played; volunteers remember the panic of being blamed; and the community remembers that this church’s system failed at a funeral.

Why It Matters

Technology glitches are annoying on Sunday.  At a funeral, they hurt.  Grief plus frustration is a painful mix, and a single failure can damage trust in the church’s care.

It’s tempting to shrug and say, “We’ll cope.”  But fragile systems invite shortcuts, and every outside event becomes a gamble.  True reliability isn’t just “it worked today” — it’s “it can reset and work again tomorrow.”

What Can Be Done

The good news is that churches don’t need fancy systems to do better.  Options include:

  • Investing for resilience: systems designed to reset easily, with confidence monitors and overflow screens that just work.
  • Stabilising what you have: fix broken cables, tidy workflows, and train volunteers.
  • Hoping for the best: the cheapest choice, but the riskiest — every funeral could be the one that fails.

The Pastoral Payoff

Reliable AV isn’t about looking professional.  It’s about care.  When families walk into church on one of the hardest days of their lives, they should be able to trust that the slideshow will run and the sound will hold.

Imagine a setup that just works — Sunday to Sunday, funeral to wedding, guest preacher to Christmas concert.  Reliability in our technology is hospitality in action.  It is one more way the church says: You are safe here.  We have prepared for you.

PS: d|c|t (Diaconate of Church Technologists) is also collecting stories for our upcoming Church+AI resource. If you’ve experimented with AI for rosters, sermons, or parish admin — or simply bumped into its challenges — we’d love to hear from you: dct.org.nz/church-ai.

Peter Lane is Principal Consultant at System Design & Communication Services and has over 30 years of experience with Technology systems.   We invite your questions, suggestions and ideas for articles.  These can be submitted either through the editor or by email to dct@dct.org.nz.  We also operate a website focused on building a community of people interested in improving how we use technology in churches, located at dct.org.nz.   

Getting Quick Wins with Tech

Simple, Affordable Upgrades for 2025

A new year is a great time to refresh how your church uses technology—without breaking the bank or adding unnecessary complexity.  Many congregations hesitate to adopt new tech, worried about cost, privacy concerns, or a lack of technical expertise.  But small, well-chosen upgrades can make a big difference in communication, security, and engagement—without requiring a website overhaul or a big learning curve.

This article explores a few easy-to-implement, budget-friendly solutions that could help your church run more smoothly in 2025.  Whether it’s improving how you share notices, automatically saving power, or rethinking security, these ideas offer quick wins that don’t demand a huge investment.

Digital Signage: A Smarter Alternative to Noticeboards

Most churches rely on printed notice sheets or bulletin boards, but a digital display in the foyer can streamline communication.  A managed digital signage solution, such as Yodeck or similar platforms, allows churches to remotely update event details, service times, and community messages with minimal effort.  This passive form of communication complements auditorium-based projection systems, ensuring key information reaches congregants as they enter and leave the building.  A simple, low-cost screen powered by a media player (NZ$200–$600) can make a big impact on engagement, especially when coupled with complementary email messages.

CCTV: Balancing Security and Privacy

Churches considering CCTV should balance security with responsible footage management.  SD card-based cameras (e.g., Reolink Argus, TP-Link Tapo) provide local storage without cloud fees, while Network Video Recorder (NVR) systems allow for longer retention (1–2 weeks).  SD card-based cameras start from around NZ$80, while NVR systems with multiple cameras can range from NZ$500–$1,500.  Clear policies should outline who can access footage, how long it’s stored (e.g., automatic deletion after 72 hours unless an incident occurs), and how footage is shared with authorities if needed.  Proper signage is essential to inform visitors that CCTV is in use.  In New Zealand, privacy laws require organisations to clearly inform people when they are being recorded and to manage footage responsibly.  Churches should ensure they have clear policies in place regarding access to recordings, data retention, and disclosure to third parties.  Additionally, there is an obligation to provide footage to individuals who were involved in an incident captured on camera, even if they are not directly related to the property.

Think carefully about where you place cameras.  Position cameras so they have the best chance of collecting clear, identifiable images – not just images of “someone” in jeans and a hoody walking around in the distance.  The cameras themselves will become targets for vandalism and theft, so keep them well out of reach and solidly secured.  Where possible, it is good to locate cameras in pairs or in a chain so that each camera is monitored by another.

Smarter Power Control with Wi-Fi Smart Plugs

For churches with site-wide Wi-Fi coverage, Wi-Fi smart plugs (such as those from TP-Link, Meross, or Amazon Basics) can automate and simplify power management for frequently used devices, potentially creating power savings and minimising the risk of electrical fires.  These allow scheduled operation of heaters, fans, decorative lighting or security lighting, reducing energy waste and the need for someone to turn devices on and off manually.  Some models even offer remote control via smartphone apps, adding convenience for volunteers and staff.  Smart plugs typically cost between NZ$20–$60 per unit.

If you don’t have Wi-Fi at your site, you don’t have to miss out completely.  Programmable timer switches provide a low-tech alternative, allowing scheduled power control without requiring an internet connection.  Basic timer switches are available for as little as NZ$10–$30.

Low-Tech, High-Impact Solutions

Sometimes, the most effective tech changes don’t involve expensive systems.  Simple initiatives like using email autoresponders for frequently asked questions, adopting online Forms for event RSVPs, or setting up a shared Calendar for hall bookings can enhance efficiency at little to no cost.

Managed Services: Getting the Benefits Without the Burden

While all these options are designed to be simple to implement, churches don’t have to manage everything themselves.  Many technology solutions—including digital signage, CCTV, and smart power control—can be set up as managed services, where an external provider takes care of installation, updates, and troubleshooting.  This approach ensures that churches get the benefits of modern technology without needing ongoing technical expertise or committing to on-going maintenance effort.

For example, digital signage platforms like Yodeck offer a managed option, with pricing starting at around NZ$14 per month (after currency conversion), which includes cloud-based content management.  Similarly, CCTV systems can be set up with remote monitoring and maintenance as part of a service package, reducing the workload on church staff and volunteers.

Final Thoughts

Technology doesn’t need to be intimidating or expensive.  By introducing digital signage, and considering responsible CCTV use, churches can improve communication and security in a way that aligns with their needs.  Small steps toward adopting tech can help congregations focus more on their mission and less on administrative burdens.

Peter Lane is Principal Consultant at System Design & Communication Services and has over 30 years of experience with Technology systems.  We invite your questions, suggestions and ideas for articles.  These can be submitted either through the editor or by email to dct@dct.org.nz.  We also operate a website focused on building a community of people interested in improving how we use technology in churches, located at www.dct.org.nz.

Unlocking the Mysteries of Website Analytics

A Simple Guide for Church Websites

For church committees today, the internet has become a crucial tool for reaching congregants and visitors alike.  From sharing service times to posting community updates, websites are often the front doors of churches.  However, there’s a common question among church leaders: “What good are website analytics for my church?”

Website analytics can seem intimidating, especially for those with a non-technical background.  But understanding a few simple metrics can offer real insights into how your church website is serving its audience.  Whether your website is updated often or not, analytics can help you make sure your site is fulfilling its purpose.

Why Website Analytics Matter

Let’s start with the basics.  Website analytics are tools that provide data on how visitors interact with your site.  This could mean tracking how many people visit your homepage, how long they spend reading a blog post, or which pages they click on before leaving the site.  For static church websites that focus on delivering information like service times and event details, analytics can show whether visitors are finding what they need quickly and easily.  For semi-dynamic sites that include weekly or monthly updates—perhaps a new sermon or community event—analytics can help you see how well your new content is being received.

Understanding user behaviour can give you insight that let you improve the experience for those visiting your site.  After all, a website that doesn’t serve its audience well could be doing more harm than good.

Key Metrics for Informational Church Websites

So, what should you actually be looking at when reviewing your website analytics? Here are some key metrics that matter most for church websites:

1. Bounce Rate

Bounce rate for the website as a whole, measures the percentage of visitors who leave your site after viewing just one page.  You will also see Bounce Rate reported for individual pages, being the percentage of visitor who leave the page without engaging with it.  For a static site, a high bounce rate might not be a bad thing.  It could simply mean that visitors found the service times, directions, or other key information they needed on the first page they visited.  On the other hand, for semi-dynamic sites that regularly publish updates or new blog posts, a lower bounce rate might indicate that visitors are sticking around to explore the latest content.

2. Engagement Time

Engagement time tracks how long users spend on your site.  For a static church site, this metric is less about how long visitors stay and more about whether they spend enough time to find crucial information like location and service times.  For dynamic sites, engagement time becomes more significant.  If you’re posting new content each month, you want to see whether people are spending time engaging with it.

3. Navigation Patterns

This metric shows how users move through your site—what they click on and where they go next.  Whether your site is static or semi-dynamic, navigation patterns are vital.  Do users easily find your contact details or upcoming events?  Are they stuck on the wrong page, unable to locate important information?  If the data shows confusion in navigation, it might be time to rethink how your pages are structured.

4. Device & Browser Information

Do most of your visitors use mobile phones, tablets, or desktop computers?  Do they access your site via Chrome, Safari, or Edge?  Knowing what devices and browsers people use helps ensure your site runs smoothly across all platforms.  If a large portion of your visitors is using mobile phones, for example, it’s crucial to check that your site is mobile-friendly—especially after updates or changes.

Setting Objectives for Your Church Website

Before diving into the details of website analytics, it’s essential to know what you want your website to achieve.  Your website goals define its purpose—objectives measure your progress, like reducing bounce rates or increasing return visits.  For a static informational website, one objective might be to reduce bounce rates on key pages.  For a more dynamic site, an objective could be to increase return visitors after posting new updates or blogs.

But remember, tracking metrics is only part of the process.  You need to act on what the data shows.  If your bounce rate is higher than you’d like, consider reworking your site’s layout or making key information more accessible.  If engagement time on dynamic content is low, try adding more visually engaging elements or personal stories.  Website optimization is an ongoing journey – try something new, evaluate the results, and adjust.  The “try, try, try again” approach is not only valid but often necessary.  It’s through trial and refinement that you’ll see real improvements over time.

Reading the Data: What’s Relevant for Your Church

When reviewing analytics, it’s important to understand the difference between what’s relevant for a static website and what matters for a semi-dynamic one.

For static websites, focus on whether visitors are finding the right information—like service times or location—quickly.  If most users are bouncing after just one page, that’s not necessarily bad as long as they’ve found what they need.  But if you see high bounce rates on less essential pages, like your About Us section, it may indicate that users are leaving without finding the key info.

For dynamic websites, the story is slightly different.  You’ll want to track how users interact with new content.  Are they engaging with it?  Do they stick around longer when new posts or updates go live?  If not, you may need to rethink how you present fresh content, perhaps making it more prominent on the homepage or highlighting it in newsletters.

Benchmarking and Industry Comparisons

When it comes to church websites, there’s often a lack of relevant industry benchmarks, especially for static sites.  However, this doesn’t mean you’re flying blind.  Over time, you can build your own benchmarks by tracking your site’s performance.  Look at data trends over months or even years to establish what ‘normal’ looks like for your site.

For more dynamic sites, you may want to pay attention to broader trends in church websites or community-focused sites.  While the numbers might vary, seeing how other sites engage their visitors could offer inspiration for improving your own content and user experience.

Takeaways: Static vs Dynamic Site Strategies

In summary, both static and dynamic church websites benefit from tracking key analytics to serve your audience better.

By paying attention to these key metrics, your church committee can ensure that the website continues to serve its congregation well—whether by providing vital information or creating engaging content for regular visitors.

Avoiding Wi-Fi Pitfalls: Tailoring Connectivity Solutions for Churches

In today’s digitally connected world, reliable internet access is crucial for the smooth functioning of any organisation, including churches and community centres.  Unfortunately, many churches fall into a common trap: they sign up for broadband plans that come with “free” Wi-Fi solutions, thinking these will adequately meet their needs.  These solutions, often designed for residential use, are typically unsuitable for larger, more complex spaces like church facilities.  This article delves into why these residential Wi-Fi solutions fall short and offers practical advice on selecting systems tailored to the unique demands of church environments.

Understanding the Limitations of Residential Wi-Fi Solutions

When telecommunications companies offer bundled Wi-Fi solutions with their broadband plans, these are primarily designed to support a “typical” household setup. A standard home Wi-Fi router might work well in a suburban residence, covering the necessary range and handling the typical number of devices connected simultaneously.  However, churches and community centres are a different ballgame altogether.

Range and Coverage Issues

Churches are often large buildings with multiple rooms, thick walls, and various architectural features that can obstruct Wi-Fi signals.  The average residential Wi-Fi router does not have the power to cover such extensive areas effectively.  Imagine trying to Imagine trying use digital tools during a meeting, only to find that the Wi-Fi signal doesn’t reach the entire space.  It’s a frustrating scenario that can hinder the church’s operations and the experience of its members.

Capacity and Performance Problems

Churches often have a higher density of users compared to a typical household.  During events, services, or community gatherings, dozens, if not hundreds, of people might be trying to connect to the Wi-Fi simultaneously.  Residential routers are not designed to handle such a high number of concurrent connections.  This can lead to slow internet speeds, dropped connections, and an overall poor user experience.

Hidden Errors and Inconsistent Performance

One of the most insidious problems with using a residential Wi-Fi solution in a church setting is that the system doesn’t necessarily fail outright.  Instead, it might work intermittently, creating a slew of behind-the-scenes errors.  The connection might come and go, or it might seem to work but with so many glitches that the overall performance is sluggish and unreliable.  This inconsistency can be more frustrating than a total failure because it’s harder to diagnose and fix.

Selecting the Right Wi-Fi Solution

To avoid these pitfalls, it’s essential to invest in a Wi-Fi solution designed for non-residential use.  Here are some key considerations when selecting a Wi-Fi system for your church:

Professional Site Survey

Before choosing a Wi-Fi system, it’s crucial to understand the specific needs of your space.  For more complex buildings, or when considering applications that “just have to work – first time and every time”, a professional site survey can help identify the best locations for access points, potential sources of interference, and the optimal configuration for coverage and performance. This step ensures that the Wi-Fi solution is tailored to the unique layout and usage patterns of your church.

Enterprise-Grade Equipment

Opt for enterprise-grade Wi-Fi equipment designed to handle larger spaces and higher user densities.  Even “Prosumer” grade equipment will give a great result in many cases.  These systems typically offer better range, more robust performance, and advanced features like load balancing and seamless roaming, which are essential for maintaining a reliable connection in a busy environment.

Scalability and Flexibility

Choose a Wi-Fi system that can scale with your needs. As your church grows or as your connectivity requirements change, you should be able to add more access points or upgrade your equipment without a complete overhaul of the system. Look for solutions that offer flexibility in terms of network management and expansion.

Security and Privacy

In addition to performance, security is a critical consideration.  Ensure that your Wi-Fi system supports advanced security features like WPA3 encryption, secure guest networks, and regular firmware updates to protect against vulnerabilities.  Given the sensitivity of some church activities, robust security measures are essential to protect user data and maintain privacy.

Practical Steps for Implementation

Once you’ve selected the appropriate Wi-Fi solution, the next step is implementation.  Here are some practical tips to ensure a smooth setup:

Engage a Professional Installer

While it might be tempting to save costs by setting up the Wi-Fi system yourself, engaging a professional installer can save you time and headaches in the long run.  Professional installers have the expertise to ensure optimal placement of access points, proper configuration, and troubleshooting any issues that arise during installation.

Regular Maintenance and Monitoring

A Wi-Fi system is not a set-it-and-forget-it solution. Regular maintenance and monitoring are crucial to ensure ongoing performance and security. Schedule periodic checks to update firmware, assess coverage and performance, and address any new challenges that might arise as usage patterns change.

Training and Support

Ensure that someone on your team is trained to manage the Wi-Fi system.  Having an in-house point person who understands the basics of network management can help address minor issues quickly and efficiently.  Alternatively, look for a provider who offers a managed Wi-Fi solution, where they take care of issues, adds, moves and changes, and regular updates for a monthly fee.  Additionally, having access to professional support from your Wi-Fi equipment provider or installer is invaluable for more complex problems.

Conclusion

Choosing the right Wi-Fi solution for your church is not just about getting online; it’s about ensuring reliable, secure, and efficient connectivity that meets the unique demands of your space and users.  By understanding the limitations of residential Wi-Fi solutions and investing in a system tailored to your needs, you can avoid common pitfalls and provide a seamless digital experience for your community.  Remember, the key is to look beyond the “free” or cheap options and select a solution that delivers the performance and reliability your church deserves.

Sidebar: Website Option for The Methodist Church of NZ Parishes

This article was originally a Sidebar published by Touchstone, the newspaper of The Methodist Church of NZ in conjunction with our article, What to Think about Before Building your Website.

An Alternative Option for Methodist Parishes

For Methodist Parishes (and Co-operation or Union parishes with a Methodist component), an option is available to have a subsite created on the main Church website (www.methodist.org.nz).  This service is currently free for both setup and recurring charges.

Being a subsite of the main website means the URL for the site will be in the format

https://name.methodist.org.nz

For example:-

The design and theme are preset (blue and orange) with limited  flexibility, although parishes have the ability to add branding logos and other custom material.  Special requirements may be negotiated with the Connexion but could involve additional  costs.  Once you have done the planning, subsites can be ready for your content in as little as 48-hours.

The website is based on the Silverstripe CMS (an alternative solution to the better known WordPress).  It is reasonably easy to use, especially once the site has been setup.  The Connexional offer includes initial support and training and d | c | t is working toward providing training as well.  Taking up this option allows you to minimise the amount of planning you need to do – the decisions around theme are largely decided for you, for example.  But is is still important to think through the process in this article.  Site Structure, in particular will need to be set by a parish and advised to the Connexional webmaster at signup to this scheme.

The content still relies on Parish brainwork and contributions!  You will be given your own login and access to be able to create and manage your own content.  As well, you are able to send your content to webmaster@methodist.org.nz and it will be loaded for you.

Email any queries to Melissa on webmaster@methodist.org.nz; please include your phone number and parish name.

Peter Lane is Principal Consultant at System Design & Communication Services and has over 30 years of experience with Technology systems.  We invite your questions, suggestions and ideas for articles.  These can be submitted either through the editor or by email to dct@dct.org.nz.  We also operate a website focused on building a community of people interested in improving how we use technology in churches, located at dct.org.nz

What to Think about Before Building your Website

So, you have finally decided to bite the bullet and build a Parish website!  Or perhaps it is more like a grudging realisation that there is no use trying anymore to tweak the 20-year monster that used to be a pretty neat website; until it got too hard to manage, the only lady who understood it moved away and it has sat gathering electronic cobwebs and happily spreading dis-information to the few people who happen across it when they have a search go wrong.  Either way, Congratulations!

First Steps

Contrary to popular practice, the first thing to do is not to run out and throw something together, (or even worse, run out and pay someone to throw something together!)  A parish website is usually a long-term, strategic communication tool (or at least, it should be if it is to create more value than it costs.  There are some cases when a website does not need to be a long-term investment, such as a website for an event or conference, but even so, they still need to create more value than they cost.) 

The first thing to realise is that value is not the same as money.  Value can be created several ways and not all of them can be neatly evaluated with a $ amount.  It doesn’t matter if your objective is building community, reaching people outside of your immediate church community, improving communications, mitigating administrative overhead or all of the above.  If you don’t have a clear understanding of what you are trying to achieve, then it will be difficult to achieve it.  One of my first Website articles for Touchstone explores this concept in more detail.  (Parish Websites: What, Why and Wherefore, Feb-2018).

Practical Considerations

Web Hosting

Web hosting refers to the how you get a computer to make your website available to other computers on the internet.  In the “old days”, this was potentially as simple as loading the right software on an old computer, connecting it to your network and throwing it all under the desk until something went wrong.  While in principle this could still happen, it is not recommended as the required software a bit geeky, and the consequences of getting it wrong include the potential for major security breaches.  Much better to rent a computer with the software already setup, sitting in an optimally air-conditioned datacentre with massive internet connectivity, all ready to make your website do its thing well.

The key things to look for with a web host service are;

  • Location: the physical location of the server should be close to where you expect your audience will be.  If your webserver is in the UK and your audience in NZ, it will take longer for the information to flow back and forth between the two locations.  There is also more opportunity for something to go wrong.
  • CMS Platform Compatibility: Ensure that the web hosting service supports the content management system (CMS) platform you plan to use for building your church website.  (See next section).
  • Reliability and Uptime: Choose a web host known for its reliability and uptime. Your church website should be accessible to visitors at all times without experiencing frequent downtime. Look for a web host with a track record of high uptime percentages, ideally 99.9% or above.
  • Scalability: Consider the scalability of the web hosting service. As your church website grows in traffic and content, you may need additional resources such as bandwidth and storage. Ensure that the web host offers scalable hosting plans or options to upgrade seamlessly as your needs evolve.
  • Security Features: Prioritize the security features provided by the web hosting service. Security is crucial for protecting sensitive information and maintaining the integrity of your church website. Look for features such as SSL certificates, regular backups, malware scanning, and firewall protection, but ensure you only pay the level of security appropriate for your requirements – not all of us are banks!
  • Customer Support: Evaluate the quality of customer support offered by the web hosting provider. Responsive and knowledgeable customer support can be invaluable when troubleshooting issues or seeking assistance with website management.
  • Cost and Value: Consider the cost of the web hosting service relative to the features and resources provided. While affordability is important, prioritize value over price alone. Invest in a hosting plan that meets your church website’s needs and offers sufficient resources for growth without compromising on quality or security.
  • User-Friendly Control Panel: Choose a web host with a user-friendly control panel interface. A intuitive control panel makes it easier to manage your website, configure settings, and perform routine tasks such as installing updates and managing email accounts.

CMS Platform

A content management system (CMS) platform is essential for building and managing your church website. Popular CMS platforms include WordPress, Joomla, and Drupal. WordPress, in particular, is user-friendly and offers a wide range of plugins and themes tailored for church websites.  The CMS for the Methodist Church of NZ parish websites is Silverstripe.  If you don’t have any idea about this, write out your requirements and get advice from an independent advisor.

Structure

Consider the structure and organization of your website. What pages will you need? Common pages for church websites include Home, About Us, Ministries, Events, Sermons, Contact Us, and Donate. Think about how you want to arrange these pages and what content will go on each page.  Also think about the hosting and security requirement required by each part of the website – obviously, a Donate page will require a site with more security than one with no money functions.

Design and Theme

Choose a design and theme that reflects the identity and values of your church. Look for themes specifically designed for churches, which often include features like event calendars, sermon archives, and donation integrations. Ensure the theme is mobile-responsive, meaning it looks good and functions well on smartphones and tablets.

Content Creation

Invest time and effort into creating compelling and informative content for your website. This includes writing clear and engaging copy, selecting high-quality images, and creating multimedia content such as videos and podcasts. Your content should reflect the mission and values of your church while also providing valuable information to visitors.  Think about how you will continue this effort into the future, both from the aspect of keeping content accurate as well as from a strategy to promote engagement by publishing new content regularly, if that is part of your requirements.

SEO Optimization

Optimize your website content for search engines to improve its visibility and reach online. (SEO = Search Engine Optimisation).  Use relevant keywords related to your church and community throughout your website content. Include meta tags, titles, and descriptions that accurately describe your pages. Consider creating a blog section to regularly publish relevant and engaging content that can attract organic traffic.

Training and Support

Ensure that members of your church team are trained to manage and update the website regularly. Many CMS platforms offer tutorials and support resources to help users navigate and utilize their features effectively. Consider enrolling in training courses or hiring a web developer to provide guidance and support as needed.

Launch and Promotion

Once your website is ready, launch it with a bang!  Announce the launch to your congregation and community through social media, email newsletters, and church announcements. Encourage members to explore the website and provide feedback for improvements. Continue to promote your website through regular updates, events, and engaging content.

The Methodist Church of NZ (and most other mainstream demoninations) have a directory page on their website listing all known parish websites.  The Methodist page is at methodist.org.nz/methodist-websites.  When your website is up and running, make sure you register it with the relevant denominations so we can all take inspiration from your work!

In conclusion, building your first church website is an exciting journey that requires careful planning, creativity, and dedication. By following these steps and leveraging the right tools and resources, you can create a dynamic and impactful online presence for your church community. Remember, your website is more than just a digital platform; it is a powerful tool for sharing your message, connecting with others, and making a positive difference in the world.

More information for Parishes connected to The Methodist Church of NZ

Peter Lane is Principal Consultant at System Design & Communication Services and has over 30 years of experience with Technology systems.  We invite your questions, suggestions and ideas for articles.  These can be submitted either through the editor or by email to dct@dct.org.nz.  We also operate a website focused on building a community of people interested in improving how we use technology in churches, located at www.dct.org.nz.   

3 tips for better Livestreams: Good cameras for Live Streaming

Welcome to the final instalment of our series, offering valuable tips for live-streaming your church services.  We hope you’ve already witnessed significant improvements in your live streams by implementing our previous tips on enhancing audio and lighting.  If you were really keen, you might have even explored our bonus tip on network connections available only on the d|c|t website.  Today, we’ll delve into another crucial aspect of streaming: the camera.

All digital video cameras essentially operate the same way: they capture light through a lens, focus it on a digital sensor composed of individual pixel sensors, and convert the electronic output into a video signal, typically at 50 or 60 frames per second.  However, not all cameras are created equal for streaming purposes.

While it’s true that you can use a phone, a laptop camera, or a webcam for streaming, it’s important to consider how they are used, which is optimized for close-up shots of individuals at a distance of about ½ to 1 meter from the camera.  This differs significantly from the requirements of a worship setting, where you need to capture a mix of wide, contextual shots of the church sanctuary and medium to close shots of key locations, such as the lectern, the altar, or the organist.  While your phone or laptop may suffice for a basic setup to get started and may still have a role for specific special-purpose shots, to elevate your live-streaming experience, it’s worth investing in a high-quality camera optimized for live streaming.

Let’s explore some examples. Cameras with 4K or near-4K resolution, capable of recording to memory cards and streaming, and produced by industry-standard manufacturers, offer impressive features. The cameras pictured above are budget-friendly versions of cameras designed for broadcast and professional video production.  However, they might not be the ideal choice for traditional churches looking to live-stream worship services.

To use these cameras effectively, you’d need to place them on tripods.  Placing a camera on a tripod in the middle of an aisle with cables running to a computer isn’t the most elegant solution and can pose safety concerns, especially when dealing with multiple cameras.  Cabling can also be complex, requiring specialized cables and adaptors.  Additionally, each camera demands a dedicated operator, potentially obstructing the views of the congregation.  Finding skilled volunteers can be a challenge, and the setup and teardown process for each use can lead to operational errors.

While these cameras can be valuable for scenarios that require high-quality video, flexibility in positioning, and creative angles, they might not be the best choice for your primary camera.

Instead, consider PTZ (Pan, Tilt, and Zoom) cameras as a simpler and more practical solution for worship streaming.  These cameras, originating from video-conferencing systems, are optimized for streaming needs.  They are compact and can be discreetly mounted on walls or ceilings.  With remote control capabilities, you can eliminate the need for camera operators at the camera location.  Some newer models even offer features like automatic tracking.  These cameras often come with native network connections for easy integration into your streaming setup.

PTZ cameras such as the ones pictured here, provide most of the same features as the cameras mentioned earlier but are optimised for permanent installation and typically don’t require a dedicated operator.  While the initial cost may be a bit higher, ranging from $3,000 to $5,000, the improvement in streaming quality justifies the investment.

In a church context, the following criteria are important:

  • Traditional churches benefit from high-resolution cameras as they allow you to create multiple views from a single camera feed, ensuring a better user experience.
  • PTZ cameras can use presets and transitions to create smooth scene changes without compromising resolution.
  • Look for cameras with optical zoom, as it delivers better image quality compared to digital zoom.

We trust that this series has been informative. If you have any questions on this topic or are interested in online training for live-streaming church services, please don’t hesitate to reach out to us.

Camera images sourced from the respective manufacturer’s websites. For more product information follow the links below.
Panasonic HC-X1500 | Canon XA60 | Sony FDR-AX43 | PTZ Optics IP20X | Angekis Saber IP20X | Telycam Drive+ N

Peter Lane is Principal Consultant at System Design & Communication Services and has over 30 years of experience with Technology systems.  We invite your questions, suggestions and ideas for articles.  These can be submitted either through the editor or by email to dct@dct.org.nz.  We also operate a website focused on building a community of people interested in improving how we can use technology in churches, located at www.dct.org.nz.   

3 Tips for Better Worship Livestreams – Lighting

image: wallpaperflare.com

My last Touchstone article was the first of a series on a few easy and (relatively) cheap ways to make your livestream experience memorable (for the right reasons!).  Perhaps paradoxically, the best way to improve the technology side of a livestream – sorry, technology can’t improve the content – is to improve the audio quality

So, your paradox detector may oscillate even more wildly when I tell you that the second most important contributor to video quality is … lighting!  That’s right, still nothing to do with actual livestream systems!  Let me quote from and article by Paul Alan Clifford, self-styled Pastor to Techies and ChurchTech consultant, from an article he wrote for churchproduction.com’s blog.

God is much better at creating things that see than we are.  Our eyes, for example, are a technical marvel.  The dynamic range they see far exceeds what most cameras can.  This one fact is why so many churches have such bad lighting.

What’s the problem?

It is often difficult to explain why it is that lighting is needed even in environments where we can see perfectly well.  Our eyes “see” far better than any video camera ever made.  They have superior low-light performance, superior colour palette, superior focusing ability and superior resolution.  Our eyes work so well, that it seems inconsequential to architects and lighting designers to include features in our buildings that are problematical (at best) in terms of delivering light to the things we want to look at.  Large windows directly behind the pulpit and top-down vertically directed lighting are 2 of the most common issues in this regard, but most of the time, our eyes automatically compensate for this, and we don’t notice – we even think the scene looks good!

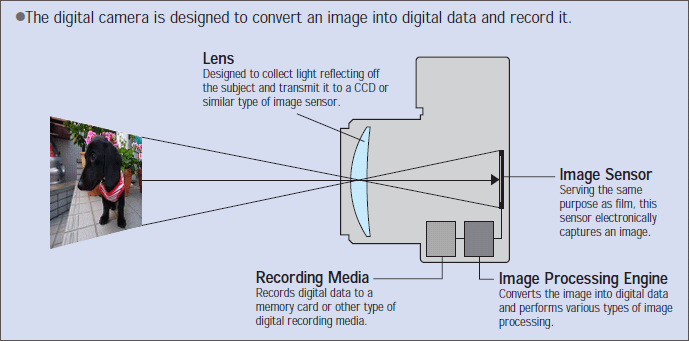
Cameras, on the other hand, will “look” at that same scene and potentially struggle to produce a usable image.  Let’s look at how a camera works.  (I’m going to walk through a typical electronic digital camera, but in terms of lighting issues, a film camera has the same types of issues, though there are more options to mitigate these in the processing stage).

So, at its simplest, a camera is a device that controls the admission of light into a hole in a box, to illuminate a sensor/recording device.  In proactice, we enhance this by adding lenses and other modifying devices to give us more control over the image we end up producing.  With a digital camera, the light entering through the lens strikes an image sensor.  The signal output by the image sensor is processed within the camera to create image data, which is stored in a memory.  For motion, multiple images are compiles into a video stream and transmitted or stored. 

Schematic drawing showing how a digital camera works

image: panasonic.com

In the camera, the image sensor is the equivalent of the human eye.  It has the role of converting the light directed on it through the lens to the electrical signals that are processed by the image processing engine.  Sensors inherently have dynamic range limitations – too much light will wash out the picture; too little light results in little or no image being recorded.  Light can be regulated to some degree by the lens aperture, (the size of the opening in the camera’s lens), which can be adjusted to allow more or less light in.  However, Cameras always require more light to produce a given image compared to the naked eye.  Even at its most open setting, a lens will not allow enough light in to produce an adequate image for livestreaming.

Camera Manufacturers have traditionally responded to this issue by using the Image Processing Engine in the camera to attempt to compensate for the sensor shortcomings as best it can.  In reality, it is the quality of the Image Processing Engine that makes the difference between low-quality and high-quality cameras.  The Image Processing Engine is a dedicated, special purpose computer that processes each image in the stream pixel by pixel.  The workload for this computer increases as resolution, colour depth or frame rate increase – there are simply more pixels to process in a fixed timeframe.  So if the scene the camera is capturing doesn’t have enough light reflecting back to the camera, the Image Processing Engine has to work even harder and may just run out of processing capacity all together, resulting in flat, sub-optimal images.  Note that it is the reflected light we need – there may be plenty of light in the environment as far as the eye is concerned.  The camera and the light source need to be on the same side of the scene for this to work.  A window behind the scene will easily overpower the light reflected from the scene, and overhead lights will light the top of the scene and cast shadows down the scene which will turn up as dark patches in the video.

Solutions

The obvious (and technically preferred) solution is to put more light on the scene, and I will give some thoughts on that in a moment.  However, I promised you easy and (relatively) cheap solutions.  So here are some ideas that may help without actually biting the funding bullet and putting in a theatrical lighting system.

  • Reduce the quality of the video output of your cameras (less resolution, colour depth, frame rate) to reduce the processing load on the Image Processing Engine.
  • If you are able to relocate any of your existing lights, see if you can move them closer to the scene, and reduce the angle to the camera.
  • Control natural lighting with blinds or curtains or similar – usually even indirect sunlight will overpower any other lighting you have.  Also, if the sun goes behind a cloud in the middle of your livestream, you may suddenly find that what was working well now doesn’t work at all.

Theatrical Lighting

Don’t get carried away – just because I said Theatrical Lighting doesn’t necessarily mean a full-on coloured light extravaganza (even though that’s so cool!!)  Theatrical lighting can be optimised to deliver lots of white light, targeted to where you need it to get great video.  Unfortunately, putting in lighting from scratch often means leaving the realm of relatively cheap solution.  Having said that, the advent of LED lighting systems has reduced the price of lighting dramatically and you should investigate fully before assuming you can’t afford it.  Some things to remember, though;

  • Check your building’s electrical capacity – again, LED lighting has reduced the requirement for power significantly, but still check.
  • Structural capacity – if you are considering mounting lights from walls or ceilings, be safe and get it checked beforehand.  Don’t forget that the Building Code will require secondary seismic restraint, so things don’t fall on you in an earthquake.
  • In a perfect world, the objective is to create a perfectly even wash of light over the full scene.  This tends to require lots of light fittings, which is why 3-point lighting was developed.  This identifies the areas of most interest in the scene and illuminates them with Key light (main light), Fill light (fills in the shadows from the key light) and Top light (sometimes called back light – this highlights the top and side of the subject so it visually “pops” out of the background).  There are lots and lots of good videos and articles on the web on how to do 3-point lighting.

Have fun experimenting – I hope there is something here that helps to improve your livestreams and videos.

Peter Lane is Principal Consultant at System Design & Communication Services and has over 30 years of experience with Technology systems.  We invite your questions, suggestions and ideas for articles.  These can be submitted either through the editor or by email to dct@dct.org.nz.  We also operate a website focused on building a community of people interested in improving how we can use technology in churches, located at www.dct.org.nz.   

3 Tips for Better Worship Livestreams – Audio

image: Freepik.com

Ok – having just narrowly prevented myself from starting yet another article with a variation on the theme of “Covid has Changed the Way We Use Technology Forever!”, I am now struggling to think of an alternative introduction to this article.

So, let me start by suggesting that the concept of bringing church services to the people is a concept that has been around long before Covid.  Indeed, it is an area of church worship that has been a relatively quick adopter of technology over many years.  Whether it is printed sermons, audio cassettes, DVDs or online platforms, the church has always had an interest in bringing the worship experience to individuals who are for one reason or another unable (or unwilling) to attend worship with their local community.  However, while there are good reasons for extending community worship beyond the four walls of a specific building at a specific time, isolation of individuals from the community of faith has been considered a bad thing, and by extension, providing tools that make it easy to isolate themselves from the community by providing a rationale that “I’ll catch-up the livestream so I’m not really missing out!”  This issue is perhaps food for another article for another time – arguably a Faith & Order matter rather than a technical matter but I have a foot in both those camps, so I don’t expect to escape.

However, for whatever reason, many churches are now trying to work out what they will do with the livestreaming setup they hastily put together in response to Covid lockdowns.  Over the next few issues, I will explore a few easy and (relatively) cheap ways to make your livestream experience memorable (for the right reasons!), starting with Audio quality.

Audio

Perhaps paradoxically, the best way to improve the technology side of a livestream – sorry, technology can’t improve the content – is to improve the audio quality.  The human brain can put up with an amazing amount of video defects so long as it has a clean, crisp and intelligible audio feed to help it fill in the deficiencies in the video.

A common strategy for first-time livestreamers is to rely on an in-built microphone in their camera device, whether a phone, webcam or even a more sophisticated camera.  The resulting sound from this type of audio setup is muddy because the microphone happily picks up every sound in the space, whether it is useful or not.  A single microphone in a space will make no distinction between sound reflected from walls, the kids playing at the back and the fire engine going past outside – it will capture everything it can hear.  If you are lucky, it will capture the preacher’s voice too.  If you are doubly lucky, the preacher will be louder than everything else put together, but there will always be some distortion as first the streaming equipment, and then the human ear, attempts to make sense of this very complex audio signal.

Ideally, we want microphones that are placed as close to the speaker (human speaker, not technology speaker) as possible, and optimised to reject as much background noise as possible.  Which, un-coincidentally, is exactly what you should be trying to achieve with a church sound system.  If your church already has a sound system, the easiest way to improve your livestream sound is to use the sound system’s sound.  Stream the video from the camera(s) and the audio from the sound system together and you should see (sorry, hear) immediate improvements.

There are a couple of caveats to this approach;

  • If your church relies on congregational singing, or has lots of responses in its worship liturgy, or other non-electronic audio that is an integral part of the livestream, then you will probably need to add some microphones to capture that audio.  However, you probably don’t want that sound to come out of the local audio speakers – to do so would be to invite instant feedback (and the ire of the now deafened congregation).  This means that your sound system needs to be able to support multiple outputs or buses and has the ability to switch specific inputs to only specific outputs.
  • Similarly, if you have someone in your livestream audience who is going to speak (for example, if you are using Zoom Meetings), the sound that originates from Zoom should never be sent back to Zoom – this time the feedback (and the ire) will be in the Zoom Room.  The solution is the same – your sound system needs to support multiple outputs and the ability to switch inputs to specific outputs.

So, give it a go and see how much better you can make your Livestream sound.

Next time, we will look at Lighting.

Peter Lane is Principal Consultant at System Design & Communication Services and has over 30 years of experience with Technology systems.  We invite your questions, suggestions and ideas for articles.  These can be submitted either through the editor or by email to dct@dct.org.nz.  We also operate a website focused on building a community of people interested in improving how we can use technology in churches, located at www.dct.org.nz

Tips & Tricks for Hosting Online Meetings and Events

It is now a cliché that Covid has caused more advances in the adoption of remote presence technology and videoconferencing as productivity tools than the industry’s marketing activities caused in the previous 10 years.

This has the potential to create large benefits, but like all technologies, has also the potential to create significant disadvantages, often due to people trying to do more with the system than it was intended to achieve. 

In the context of remote meetings by video conference, this often takes the form of assuming that people develop a relationship with each other just as well over video as they do in “real life”.  The reality is that, while it can be done, the relationships people form using video-only take longer to form, are not as deep and break down more easily than the relationships between groups that meet in person, even only occasionally. This can be important to understand, as particularly in governance contexts, the relationship between meeting members directly contributes to the meeting’s effectiveness.  Video calls let people fill in a speaker’s intent and motivation more than text-only or voice-only communication, but this is kick-started by having pre-existing face-to-face relationships.

Another disadvantage is that all the tips and hacks we have learned to make running meetings easier in a lifetime of face-to-face meetings, now need to be re-learned (or even discarded) to suit the digital medium our meetings now tend to use.  This article hopes to present some tips for running meetings and events online to mitigate this issue.  They are aimed at meeting organisers but hopefully will be of interest to others as well.  “Meetings and Events” is a large scope, though, and not all events will need the same level of attention.  Each meeting will have its own requirements for formality, record-keeping, interaction and relationship; and these requirements will translate into different ways to manage the specific meeting.

Planning and Preparation 

Hopefully, this is something you do for face-to-face meetings as well.  Because video communication leaves out a lot of the subliminal content we unconsciously take for granted for in-person meetings, good planning and pre-meeting communications are arguably even more important. 

  • Set up the meeting and invitation as far in advance of the meeting as you can, and configure it so that participants can join the meeting (at least to the waiting room) before the meeting and encourage them to check they can access the meeting with all the audio, video, sharing etc working as they expect.  For a presentation or seminar, you may even consider doing a “dry-run” with the presenters. 
  • Produce a “running sheet” for the event.  This is like an agenda, but is typically more detailed and focused on the production requirements, not the content.  It could indicate things like timings, backgrounds, and resources needed when things like notices need to be put in the chat, when videos need to be played etc. 

Minutes 

One thing I learnt as a consultant is that it is really, really hard to both run a meeting and take good notes.  Contrary to a lot of opinions expressed to me, this doesn’t get easier in an online context.  In fact, if you have to manage the technology as well, you are now trying to do 3 things at the same time instead of two. 

  • Appoint someone whose only job is to take notes.  If you need to do more than fire up the meeting and share a screen once or twice, appoint someone else to manage the technology.  If it’s even mildly complex, consider producing a running sheet for them. 
  • Consider using a software notetaker.  With the surge in AI that’s happening in the tech space just now, there are some significant advances in this space.  I’ve been playing with a Zoom plug-in called Fathom AI notetaker for a while and the results are impressive.  I initially considered it a good fit only for enterprise sales calls it now seems to be a good general-purpose tool.  At a meeting last week, I was blown away by the 2 sentence summaries it generated on the fly for each section of the meeting. 

Screen sharing

If you are sharing a document or a PowerPoint slide, consider logging into the meeting from a separate computer (no camera or microphone needed) and sharing the document from there.  Then you can Pin the screen or remove it as required.  You can also pin the document side by side with the speaker, giving a much better view of the speaker than Zoom’s default thumbnail view. 

Running the Meeting or Event 

  • When hosting a video call with a large group, try to ask specific questions to specific people, and use their names when doing so.  This establishes who will be answering the question and avoids the ever-awkward “No, you go ahead.  No, you!” situation. 
  • If you (or your technical delegate) need to share information in the Chat during the meeting, set all the information up beforehand in a document, then cut and paste it at the relevant time.  This saves getting it wrong at the psychological moment or forgetting.  Don’t forget to put the name and location of the file in the running sheet! 

If nothing else, consider these six golden rules for better video meetings, (adapted from a Trello™ blog post): 

  • Use video for strengthening existing relationships 
  • Have equipment that works – and test that it is still working before your meeting 
  • Look professional yourself and aim for a professional-looking delivery, flowing smoothly from topic to topic. 
  • Make sure everyone feels included 
  • Set up team rules to make video meetings more manageable – this can be just as simple as waiting till called on before speaking, but whatever the rule is, it needs to match the requirements and purpose of the meeting.  For example, if you are running a brainstorming meeting, preventing people from speaking till called on may be counterproductive. 

Church Management Systems

What do Breeze, Wild Apricot, Toucan Tech and Infoodle have in common?

They are all examples of the names chosen by the developers of specific examples of a – relatively – new type of software, Church Management Systems or ChMS.  Perhaps it would be more accurate to say that this type of software is enjoying a revival, as similar programs have been around for about as long as programmers have been involved in churches.  However, the current ChMS solutions are leveraging the commercial sector success of CMS solutions – Customer (or Client or Constituent) Management Systems.  Consequently, the underlying technology is very robust.  [Note: frustratingly, CMS is also used for Content Management System, a website solution component.  Some providers get around this by using CRM for Customer Relationship Management]

The underlying premise being all CMS systems (including ChMS’s) is that collecting all the data about one’s customers (or congregants) that can be accessed by all authorised parties in the organisation.  This leads to a number of benefits;

  • There is “one source of truth” – if Mrs Smith tells the door greeter that she has a new phone number, then (in theory – humans can still break the system) everybody else using the CMS can access that number as well. 
  • A centralised solution is also easier to keep backed up (and because it is a centralised solution, it is more critical to make sure it is backed up).
  • A benefit for larger organisations is that if the ChMS records details of all interactions, then if a contact makes a call to the office, then it doesn’t matter who answers, the answerer able to bring themselves very quickly up to date with the context and requirements for that contact.  In a church context, privacy and confidentiality requirements need to be observed, but the principle still applies, especially for administrative matters.
  • ChMS solutions usually support managed communications and automation.  Need to send out a reminder for that special Sunday School event?  Email the pew bulletin to non-attendees?  These types of communications have the potential to make people feel wanted and included but are typically not done because they are too time intensive.  CRMs can make this type of communication happen for the cost of a few hours of upfront set-up and some regular procedures to ensure details are captured and kept up to date.
  • ChMS solutions can keep track of skills, qualifications and expertise held by members and staff.  If a job comes up that needs specific skills or qualifications, you can quickly find out who has those skills.  If a qualification needs to be renewed from time to time, you can have reminders sent to relevant people when renewal action is required.  You can organise all your contacts into groups so that sending an email to the Parish Council, to the entire congregation, or to Homegroup members are all just a couple of clicks.  Most ChMSs will take care of privacy issues for you by hiding everyone else’s email address.
  • Safeguarding and protecting the vulnerable – these features have become particularly important during the pandemic.  Most ChMSs provide some level of “Check-in” capability to allow you to know exactly who was at a given event, track attendee numbers against a limit and allow follow-up to attendees – whether to say, “Thank you for coming” or, “We’re sorry to advise that one of the attendees has tested positive”, as the case may be.  We also live in a society that is increasingly paranoid about the safety of children.  Civil requirements for managing children’s groups are becoming increasingly complex and are likely to become mandatory in time.  Most ChMSs can offer at least minimal solutions to assist manage these requirements, ranging from Check-in/Check-out capability, recording who dropped off or picked up a given child, restricting who is allowed to pick up a given child, to recording allergies or medical conditions and specific first-aid protocols for individuals.  To my mind, it is these types of features that make the most compelling case for churches to adopt ChMSs at the moment.
  • Overall, the benefits of ChMS can be summed up as releasing time spent on administrative tasks for missional and relational activities.  Churches have a large volunteer work component, but it is decreasing over time, so if there is a way we can shift our volunteer resources from administration to strategically focused activity, there should be a significant benefit.

Considerations

Modules, modules and more modules!  ChMS vendors seem to love modules.  The typical product structure is a core module with at least the CRM functions and a number of optional add-on modules (usually at additional cost) providing additional features such as Accounting functions, Donor management, Service planning, Attendance Tracking, Online Giving etc.  Make sure you get all the features you need and that you understand exactly what that costs.

International Law.  If you are looking at Accounting or Donor management or similar features, make sure that the solution you are thinking of complies with NZ requirements rather than US or EU requirements.

Buy a system with room to grow.  Church management systems can help you grow your ministry, so be sure to buy a system that can handle more than your current needs.

Think twice about building your own system.  It may seem tempting to build your own church management software to save a little money, but in the long run, you will end up spending more.  You will likely not be able to migrate easily to another solution or share data with others if you take this path.  Leave the software to the experts and focus on what you do best: building your congregation.

How to Create Graphics for Websites & Social Media

Buidling the word website (with cranes).
Creating Graphics for websites and Social Media

Among other things, a global pandemic can change the way we communicate.  The Covid pandemic is no exception. Now, it is more important than ever that we know how to create effective graphics for websites and social media.

Before Covid, we went to meetings – now we Zoom.  Before, we printed pew bulletins – now we have an email list and Facebook groups.  Before, we did audio recordings – now we Livestream on YouTube.  Before, we had church notice boards, now we use websites.

Ok, so I’ve allowed myself a smidgeon of hyperbole here.  While all of these were around to a certain extent before the pandemic to a greater or lesser extent, but there is no denying that communication technologies have made substantial inroads into the mind of our society in the last 2 years and we have all come to terms with dealing with “new-to-us” technology and processes in our daily lives.  Wherever you are in your communications journey, it is fair to say that a 1950’s line drawing that has been circulating in a giveaway clip-art collection for the last 50-years stuck next to some typescript probably isn’t going to cut it anymore, not at least for anything with a digital presence.

As webmasters and Social Media authors for churches on a budget, one of the new essential skills we have been expected to acquire is the ability to quickly create good quality graphics for our websites and social media endeavours.  The effectiveness of digital communication is increasingly being driven by the graphics used rather than the content.  In fact, in saying that, I am at risk of showing my age – arguably today’s media is being measured by millenniums and younger by its use of video, even more than by graphic elements.  Coupled with a drive to produce content responsively quickly and (of course) cheaply, a number of graphics authoring tools have appeared and established themselves in the market.  Some of these tools are now also branching into basic video creation as well. So, how do we create graphics for websites and social media? (Not to mention, cheaply)!

Advantages of Graphics

These tools are quick to learn and easy to use, come with copy-right cleared templates and images to get you started quickly and produce output in sizes and colour palettes optimised for various websites and social media platforms.  There are some very good image production programs around now, but they are expensive, are complex and difficult to use (so you have to be trained to use them well) and can take hours to produce one image even if you know what you are doing.  Fundamentally these tools I’m sharing today are about saving time. 

One of the main time-consuming tasks for any comprehensive social media strategy, even if you have an image to start with, is changing the size of the image to suit the different requirements of different media platforms.  A Facebook post is optimised for images of 1200 x 630 pixels, but on LinkedIn, a post is optimised for an image of 1200 x 1200 pixels, and different requirements for other platforms.  Most platforms will do their best to adjust for non-optimal images, but you may lose information or legibility in the process.  The upshot is if you are using any sort of multi-platform media strategy, you spend half your time adjusting the sizes of your images for different platforms.

Finally, a few last notable features.  Most of these tools are built for collaboration, so you can invite others to contribute to your artistry.  Whether this is a couple of arty friends to get down and dirty with you in the design process, or just sharing the final version with Parish Council for approval, this is a key capability for many people.  Also, have links to internet just-in-time printing services, so you can order tee-shirts, coffee mugs, carry-bags and many more merchandise items to be printed with your design (for an additional cost, of course).  But an easy way to organise youth group tee-shirts, posters and similar items.

Graphics Programs

So here are descriptions of 3 examples of this type of solution.  There are many, many more but I’ve chosen these as being reasonably representative of the ones I’ve come across. 

Canva – In graphic design circles, Canva is generally considered the gold standard for others to aspire to.  It is reasonably priced and has a great selection of images to choose from.  Perhaps the best feature for the readers of this article, it has a non-profit program accessible to NZ Charities, offering free use of their Pro paid version if you register your organisation with them.  I use Canva a fair bit for website work – some of which is on the NZ Lay Preachers website (nzlpa.wordpress.com) e.g. the “Don’t Miss Out” badge on the front page at the moment.  Canva is particularly good at taking a graphic and then allowing you to quickly go through the process of re-sizing and adjusting for different Social Media platforms.

Visme – this is the tool I’ve used least of these three.  It has a growing presence in relevant discussion groups and is a leader in that it is promoting itself directly as a video tool with graphics capability rather than the other way round.  While Visme feels a little different to use than the other options, it is by no means difficult – especially if you come to it with no history of the alternatives.  They have a good selection of useful articles in their knowledgebase, including the most comprehensive listing of what image sizes you need to use for which social media platform I have ever come across.

Snappa – I have used Snappa largely for YouTube work (video thumbnails, channel headers etc) because it has some very intentional features to support YouTubes requirements.  Otherwise, it is quite similar to Canva.  One area I haven’t had a chance to use much as yet is the capability to automate your social media posts (paid version only).  Once you complete your graphic, you can ask Snappa to post to each platform you use at a specific time and date.

Comparison Summary

 CanvaVismeSnappa
Websitehttps://www.canva.com/https://visme.cohttps://snappa.com/
Preset Social Media dimensions for posts and imagesYesIs aware – templates are pre-sized correctlyYes
Free Version limitations5GB storage; selected templates100GB storage; selected templates; Visme logo on outputsLimited to 3 downloads per month
Cheapest pay-monthly planNZ$19.99 per mth~NZ$17.90 per mth; (USD12.25)~NZ$14.60 per mth; (USD10.00)
Video capabilityYesShort videos & Animations 
Non-profit programPro Free for NPs listed on NZ Charities Commission Register25% discount; no info on eligibility 
Remove Image Background toolOn paid plansNoYes
Free copyright-cleared stock photosYesYesYes
Automated Social Media postingOn paid plansImmediate Post only, on paid plansOn paid plans

I hope this article helps you find a way to quickly create graphics for websites and social media. I encourage you to share your results as a comment to this blog for the inspiration of us all.

Author - Peter Lane

Peter Lane is Principal Consultant at System Design & Communication Services and has over 30-years’ experience with Technology systems.  We invite your questions, suggestions and ideas for articles.  Submit these either through the editor or by email to dct@dct.org.nz.  We also operate a website focused on building a community of people interested in improving how we can use technology in churches, located at www.dct.org.nz

Copyright “gotchas” in Online and Hybrid Worship

I concluded my last column by promising you something “fun and techy” for next time.  Well, my apologies, I don’t think this quite qualifies. 

After a recent seminar (online, of course) I was asked the following question by one of the participants.

“I didn’t quite understand in the [ … ] tutorial about how we can get prosecuted using YouTube™.  Please can you enlighten me?”

The participants of the seminar had been discussing the downloading of YouTube clips for incorporation in an online worship experience.  The issue is much broader than just YouTube, though YouTube manages to put a few specific wrinkles on their part of it. 

Anyway, I started a response to my questioner and half-way though realised – this should be my next Touchstone article!

Let me start with a disclaimer – “I’m not an Intellectual Property Lawyer”.  I have learned a lot of stuff about copyright by necessity over the years and I offer these guidelines in good faith.  However, copyright is a dynamically changing environment with multiple nuances.  So, if you are using this article as the basis to make big decisions, please do some independent due diligence first.

The YouTube Trap

With YouTube, there are two big issues:

  • 1 – The contract problem  

YouTube’s Terms and Conditions require content to be served by them. Downloading it breaks your agreement with YouTube, and you might also expose them to breaching their own agreements with content owners.

  • 2 – The publication problem

By default, internet content is for private enjoyment. As soon as you show it in a Zoom, or at a service, you’re effectively publishing or broadcasting it. That’s what breaks copyright.

Performance Copyright? Oh yes.

Even if you’re not using YouTube, music comes with another wrinkle: performance rights. The rights to a specific performance — e.g. a singer’s rendition of a hymn — are separate from the rights to the words or tune.

“But we’ve got a CCLI licence!”

Yes. Many churches do. But it’s not a silver bullet.

The basic CCLI licence covers the reproduction of lyrics — either printed or projected — for use by your own congregation.

It does not cover:

  • making recordings,
  • sharing services on websites,
  • or livestreaming.

To do that legally, you need more than the base licence.

Let’s run through some examples…

Scenario 1
In-person worship, PowerPoint of lyrics, live music from organist.
✅ If the songs are covered by CCLI, all good.

Scenario 2
Lockdown hits. You’re now on Zoom with lyrics shared via screen.
🟡 Probably fine — it’s a closed meeting with invited participants.

Scenario 3
You record the Zoom or stream it on your website (or YouTube/Facebook).
❌ Not OK. You’re now a publisher/broadcaster. You need a separate licence.

Scenario 4
Organist is injured. You add accompaniment MP3s to the PowerPoint.
🟡 It depends. What licence came with that accompaniment track?

Scenario 5
You switch out the dull legal track for the artist’s CD version.
❌ Definitely not OK — unless you’ve got the artist’s written permission, or the rights-holder’s.

What’s the fix?

CCLI offers a Streaming Licence add-on that helps cover online services and recordings. It’s not included by default — you’ll need to apply (and pay) separately.
Check at https://nz.ccli.com/copyright-licences/#church-licences.

Don’t forget images and prayers

Yes, lyrics are the headline issue. But everything you put in a PowerPoint — photos, art, responsive readings — needs to be treated with the same care.

That’s the super-simplified version – there are various ways you can get permission to use various media,  Licences are almost always available, but not usually without copious amounts of research, hard work, blood, sweat, tears and yes, money.  Almost always you have to make arrangements in advance and in writing.  Success is not guaranteed – pray hard!

(Reformatted Jul-2025)

Peter Lane is Principal Consultant at System Design & Communication Services. He welcomes your questions and article suggestions via dct@dct.org.nz. You can find more resources at www.dct.org.nz

What Was That? – Hearing Augmentation Systems

As I found while researching this article, the statutory requirements relating to Hearing Augmentation Systems (sometimes referred to as Hearing Assistance Systems, or Listening Systems) in NZ buildings are Convoluted, Confusing and Contradictory.  But I knew that – that was why I thought it would be a good topic for this column; I still wasn’t prepared for how much CC&C there actually is!

And to make it worse, compliance is signed off at the individual Territorial Authority level, and the interpretation of what is deemed to comply varies from Authority to Authority; sometimes from Building Surveyor to Building Surveyor.

Hearing Augmentation Systems are systems put in place to allow aural information to be conveyed to Building Users clearly and accurately.  The Building Act and NZS4121 (Design for access and mobility – Buildings and associated facilities) are clear that the scope includes users who don’t require hearing aids; however, the Building Code clearly states the requirement is only for persons requiring hearing aids (G5.3.5).  The guidance that is given in these documents and other related materials is that the Building Code is the minimum standard and the expectation is that an adequate solution will be designed for a given space, taking into consideration the requirements of the particular location and function of the space.  There is also a requirement that Hearing Augmentation systems are maintained 6-monthly.  In theory, they should appear on a building’s compliance schedule and are part of the Building WOF process.  Also, because they are disability systems, the building must have prescribed signage.

Hearing Augmentation technology and Hearing Aid technology are both in the middle of the technological revolution – both are adopting “new” digital techniques and methods to implement the required functionality and feature set.  Hearing Aids, in particular, are adopting new technologies rapidly such as linking to a user’s smartphone.  The drive for miniaturisation, however, means that Hearing Aid manufacturers are increasingly leaving out the T-coil which has been the basis for Building Hearing Augmentation systems since the 1960s.  The next 10-years will be interesting as the new technologies are trialled and adopted, and transition through the hearing aid population.  Hopefully, it won’t take the legislation too long to catch up.

Hearing Augmentation Systems

So, what types of Hearing Augmentation systems are there?

Sound Capture

Firstly, all Hearing Augmentation systems require a system of microphones or other audio input.  This can be built into the system itself or can be acquired via a sound system.  In some circumstances, this means the sound system needs to be left on even though it is not needed in its own right.

Audio-Frequency Induction Loop Systems (Hearing Loops)

These loops are usually installed in meeting rooms or in other places where people gather.  They assist people who have hearing aids fitted with a T-switch.  They can also assist people without hearing aids if the user is provided with a loop receiver device.

In addition to permanently installed hearing loops, there are portable hearing loops available.  These can be used in small spaces such as meeting rooms or motor vehicles.  Loops are sensitive to building construction and other wireless frequency emitters (including other Hearing Loops, so they are not good in multi-room environments).

Infrared Systems

Infrared systems take the sound input signal and broadcast it on an Infrared frequency within the space, which is then picked up with a system-specific receiver worn by the user.  These systems generally require a direct, unblocked, line-of-sight to the user and require users to obtain and wear a receiver with the appropriate attachment.  They can be used by users without hearing aids.  They are sensitive to very bright lights and sunlight and the receiver unit must be worn outside clothing etc.

Building operators need to keep a supply of receivers, batteries and headphones forbuilding users to use as required.  Headphones or in-ear devices are subject to Public Health cleaning requirements.

FM Wireless Systems

Structurally, these are very similar to Infrared systems but use FM radio frequencies rather than Infrared frequencies.  Consequently, they are not limited to direct line-of-sight.  Receivers can consequently be put in a pocket or handbag with relatively minor impact to performance.  While they are not impacted by sunlight, they can be affected by other wireless emitters.

There may be some old wireless systems around that use VHF radio frequencies.  Given the recent changes in frequency allocation in favour of mobile phone service providers, continued use of this band is problematic.

Peter Lane is Principal Consultant at System Design & Communication Services and has over 30-years’ experience with Technology systems.  We invite your questions, suggestions and ideas for articles.  These can be submitted either through the editor or by email to dct@dct.org.nz.  We also operate a website focused on building a community of people who are interested in improving the way we can use technology located at www.dct.org.nz.

Parish Websites: Content Management Systems

Earlier in the year, I wrote a column on Parish Websites and promised I would write some follow-up articles. 

As discussed in the previous column, Websites are fundamentally a collection of documents on a server running a program to use a set of defined technology protocols to make the documents available for display on a remote, but network-connected computer.  The motivation behind the original technology was to create an easier way to share academic research within the academic community and focused on text documents.  Over time, the enabling technologies have been expanded and evolved so that now, website technologies are what drive everything from online banking and online shopping to social media to remote control of your house’s air-conditioning and lighting.  Today, a “standard”, bread and butter website would use server-based software called a Content Management System (CMS) and build the site out of a collection of components that contain content and display that content in different ways.

When Tim Berners-Lee developed the Web in 1989, he envisaged a system where authoring content was very simple and could be done but virtually anyone with access to a computer and a text editor.  The content was simply typed in and formatting was applied using Hyper Text Markup Language (HTML).  The result may not look particularly flashy by today’s standards; however, was quite adequate for the original purpose of sharing academic research.  In principle, one can still produce websites in this way, but the Digital Natives who have grown up with the web will probably tell us the result is not worth the effort.  This may be ok for some purposes, but if part of the reason for a website is engaging with and being attractive to the site’s audience, then it’s probably not a good idea.  The reality is, to use modern display methods and techniques with text files is virtually impossible; and where it is possible requires the author to have a lot of technical knowledge.  Thus, Content Management Systems were born.

CMS have a broader context than just websites but for this column, we will ignore that and are really only thinking about Web CMS.  Web content includes text and embedded graphics, photos, video, audio, maps, other media and program code (e.g., for applications) that displays content or interacts with the user.  The primary advantages CMS provide for websites are;

  • Reduced need to code from scratch
  • Easy to create a unified and consistent look and feel
  • Version control
  • Edit permission management (control of who can edit / delete what content)
  • Preloaded content can be automatically published and/or taken down to a schedule

It’s not all roses though.  The key disadvantages of CMS are;

  • Limited or no ability to create functionality not envisioned in the CMS (e.g., layouts, web apps, etc.).  Basically translated, this means that imagination is always better than computers.
  • Increased need for special expertise and training for content authors.

Choosing which CMS to use (or which web service to use) can make a huge difference to how easy your website becomes to maintain a website.  Things to be considered include;

  • Features – does the system let you do the things that are important to your site.  An important feature to look for is whether there is separation between how your website looks (style) and the content that delivers your message.  Usually, you want content providers to just worry about content, and the looks get set by a template or specific
  • Flexibility – supports features like templates and add-ins that make it easy to change a whole website or add a new feature.  Having said this, too much flexibility actually adds complexity and potentially makes things harder.
  • Support – how easy is it to get technical assistance, trained and experienced contractors and things like templates and add-ins?
  • Price – yes, money matters.  However, there are a lot of free and/or cheap products available. 

Choosing a CMS

In the real world, there are hundreds of CMS to choose from.  Here is my take on a few important ones.

WordPress is the most popular web CMS in the world, usually reported as being used by about 30% of active websites worldwide.  In the past, I hated WordPress with a passion – I thought it was too hard to use and it had an abysmal user interface.  However, the releases over the last 10 or so years have made major improvements and I’m quite happy with it now.  Being popular means that there is a wealth of resources available to support WordPress use, though this wealth adds some complexity.  Try and minimise the number of add-ins you require.

Methodist.org.nz is powered by Acclipse.  There are not a lot of good things to say about Acclipse.  Another Methodist website, kiwiconnexion.nz is powered by Mahara.  Mahara extends the concept of a CMS by adding specific features relevant to education providers and is actually a class of software known as Learning Management Systems (LMS).

At the end of the day, though, it is not usually the technical bits of a website that make it good or bad.  What matters is the impact the site’s content has on the community it is intended for.  But that is a column for another issue.

In the Cloud, or on the ground?  A short History of Cloud Computing.

One hears the term “Cloud Computing” and related phrases a lot these days.  Probably too much – as with a lot of catchy phrases, the marketing machine has picked the phrase up and boldly applied it where no phrase was meant to go.  Quite frankly, “cloud” is now one of the most used and abused terms in the Technology space – much of what is claimed as cloud quite simply isn’t.

So, what is Cloud Computing supposed to be?

The answer is wrapped up in the history of computing development.  Initially, computers were standalone devices without connection to other computing devices – any application you needed had to be physically installed on the computer.  Then in the seventies and eighties, the computer network flourished.  Applications from other computers could now be accessed, at least at the Local Area scale.  A whole generation of special computers were developed – called servers – whose main function was to make applications and data available to other computers- client computers – on a local network.  In the meantime, the Internet developed and became widely accessible.  The basis of the internet was that it was a network that connected local networks according to a set of relatively immutable rules (inexplicably called Request for Comments or RFCs for short).

Consequently, Network Engineers became increasingly focused on what needed to happen at the local part of the equation, so in diagrams of network systems, it became accepted practice to draw the Internet part as a cloud.  The engineers needed to document that the internet existed but didn’t need to concern themselves with the details of how it happened.  Rule of thumb for good system architecture became to provide a good Local Area Network with all the resources it needed – application servers, storage etc.  These could communicate with other Local Networks if needed for coordination and some degree of sharing, but basically, all networks provided all their own resources

However, over time the capabilities of computers, networks, communication links and servers have increased exponentially.  One day, some bright young spark said: “Instead of duplicating all this Application stuff in every local network, why don’t we move it to the cloud and share it between local networks?”  And so, cloud computing was born.

There is one further piece to the puzzle though.  This cloud way of operating was fine if you were a large, enterprise scale entity and could afford the up-front investment in physical infrastructure and make sure that the infrastructure was properly maintained.  If not, you probably still had to do things the old way.  The other piece of the puzzle is a business model initiative rather than a technology change.  Software vendors started making software available in the cloud on a “rental” basis instead of a lump-sum, lifetime license.  In essence, they started renting you the software bundled with the cloud-based server to run it on, the technical support and physical support to keep the server running.  All you needed to do was provide a device and the communication services to access the server.  This model is called Software as a Service (SaaS).  Today, the phrase “cloud computing” usually means some form of software or application delivery from cloud-located servers on a SaaS model.  And it is not limited to commercial software offerings – the church nationally could commission custom applications that use this model.  The recently announced Methodist App is an example of this approach.

Enough History; What does this mean for the church?

There are several important benefits of this approach, but for me, one of the best benefits for a geographically distributed organisation like the church is that it the advantages of large-scale information systems and communication systems can now be relatively easily applied at a congregation level, without needing to rely on locally-based skilled support persons.  While there are still some issues that need consideration, there is now no reason why a congregation of 10 should have any different facilities that a congregation of 1000.  So, get thinking about the innovative things we can do with this resource!

Streaming Worship services

I have been visiting with Takapuna Methodist church this past month and came away very impressed at the simplicity and elegance of the setup they use for “streaming” their Sunday worship service.  The facility provides a means for the congregations sick or housebound members to still experience the Sunday worship and feel they are part of the community.

Fundamentally, the setup is very simple – an iPhone is mounted on a tripod at the back of the church and runs a Facebook Live session to the church’s Facebook Page by means of the standard Facebook Pages app.  The quality of the end-product, using the phone’s camera and the built-in microphone was surprisingly good (though perhaps the fact I am surprised is only a give-away as to my age!)  The primary drawback was that the audio was a bit muffled and echoey but not to the point of intelligibility.  Of course, the iPhone is not required – with a little thought, you could make this setup work with just about any mobile device or computer.

So how would one go about improving this set-up?  The first option to consider is improving the audio.  One option is to add an external microphone to the iPhone.  Shure, Røde and a number of other manufacturer’s make a number of microphone models designed to plug directly into an iPhone, usually via the lightning connector.  (Similar products are available for non-Apple devices using USB connection, and there are still a few options that connect by the microphone input which will work with most mobile phones, though we suggest this last is a last resort.)  The other option worth considering is to pick up the sound from a sound system (if you have one).  How you would do this exactly would depend on the specific audio equipment you have and what spare capacity it has.  Devices exist (again, Shure, Røde et al) that can capture the sound coming out of an audio mixer and sending it to the iPhone to incorporate with the video.  The downside of this is you tend to only hear people using microphones – audience responses and congregational singing will likely be lost unless you intentionally set up microphones to capture this.

There are some risks / legal matters associated with streaming that need attention.

Privacy – you need to take reasonable efforts to ensure that identifiable images of people are not broadcast without there permission.  Usually, the easiest way to deal with this is to only broadcast a general wide shot where individuals are not readily identifiable.

Copyright – The standard CCLI NZ license allows you to record services (including copyright material covered by CCLI), but the recording should only be made available to congregation members.  In the context of streaming, this would suggest that a password or similar mechanism should be used to restrict access to the stream.  I would suggest that you should never re-stream a commercial video (even if you have the appropriate CCLI licence to play it in your service).  Ideally, everything you stream should come under the category of either original content or authorised content.

References

CCLI Guidelines – https://nz.ccli.com/what-we-provide/faq/#internet

Shure Motiv™ – http://www.shure.com/americas/motiv/overview

Røde – http://www.rode.com/microphones/mobile

Note

The camera shown in the illustration for this article does not actually support streaming. Equivalent camera models that became available after the publication date do.

A quick guide to using microphones effectively; a presenter’s perspective

A lot of us never need to get behind the business end of a microphone. But for those who have to present regularly, it is important to have a basic understanding of how different microphones work. Then we are able to adapt our speaking technique to suit the microphone in front of us as we deliver our message. This is a quick guide to using microphones effectively for presenters of all ages!

Microphones are components in virtually all audio systems.

Thus, you’ll hear about studio microphones for recording and PA microphones for live sound. There are boom microphones for broadcast or film shoots.  Or instrument microphones which attach directly to guitars or other musical instruments.  Then there are boundary microphones or boundary effect microphones for theatre work or conference systems, lapel mics for seminars and business meetings, and headset microphones for telephone call centres. (And this is just to mention a few options). The different types of microphones optimise a range of different requirements in different environments.

That said, all microphones have one thing in common: “microphones convert a sound wave into an electrical signal in which the voltage and current are proportional to the original sound”.  To perform this task microphones use a thin membrane, known as a diaphragm, which mimics the function of the human eardrum.  Sound waves strike a microphone’s diaphragm and cause the diaphram to move. Harnessing this movement creates an electrical signal.

A sound is essentially a change in pressure that varies in specific ways over time to create specific sounds (sound waves).  When sound waves strike a microphone’s diaphragm, they cause it to move, which movement, in turn, creates a variance in an electrical current (aka signal).  The electrical signal is transmitted to output devices, which either process the electrical signal (store it, or make it louder, or make it sound like Darth Vader on a bad hair day), or use the signal to recreate sound waves (loudspeakers).

Microphone Types

Microphone engineers, over the course of “recorded” history, have developed 3 fundamental techniques for detecting sound waves and “transducing” sound to electrical signals. 

Dynamic Microphones

A dynamic microphone uses the diaphragm to move a coil of wire within a magnetic field to create the electric signal.  It’s advantages are it’s relative simplicity and good voice frequency characteristics.  A dynamic microphone is quite sensitive to interference from external electromagnetic fields. If your venue has a hearing aid loop, you don’t want to try dynamic microphones. 

Condensor Microphones

A condenser microphone uses the diaphragm to move one side of a capacitor plate thus causing the capacitance to vary. This creates an electric signal.  The advantages are it has good resiliency, can cope with large variances in the sound loudness and tends to have a larger frequency response.  Condensor microphones are often used for instrument microphones, however, are the basis for many vocal microphones as well.  The disadvantage is that the capacitor requires a power source to keep it charged. Therefore, a condenser microphones require either batteries or a power supply delivered from the connected equipment. 

Ribbon Microphones

Ribbon microphones consist of a thin strip of metallic foil suspended in front of a magnetic plate.  Sound waves cause the foil to vibrate, producing fluctuations in the electrical current, creating the audio signal.  This extremely sensitive configuration picks up a wide range of frequencies and produces an extraordinarily rich representation of the original sound.  The trade-off for this sensitivity is the delicacy of the mechanism – ribbon microphones are very sensitive to physical impacts and power overdrive.  (Oh, and very expensive).

System Engineering

The other factor that effects using microphones is the system engineering.  A system engineered for voice reinforcement usually uses rather sensitive microphones and try to “hide” the microphones away so they don’t distract from the presenter.  A vocal microphone for a rock band vocalist, by contrast, can have much lower sensitivity. In this case, however, the microphone is held within millimetres of the vocalist’s mouth. This means that the microphone “hears” only the voice and not the other instruments around it. 

Principles for Presenters

So, as a speaker/presenter, how do you make sure you are heard and understood?

  • Learn to recognise – or at least be able to take a good guess – at what internal configuration and pick-up pattern the microphone has.  If you have the opportunity to research beforehand, do so.  Then adjust your speech style accordingly – speak “firmly” to dynamic microphones, but more relaxed and rounded to condenser microphones.
  • When you have a sound operator, work in cooperation with them. A good sound operator will usually have a better understanding of the capabilities of the microphones they can offer.
  • While standing normally, move the microphone so you are “looking down the barrel” of the microphone.  If you can’t move the mic, move yourself.  For guidance in using voice reinforcement systems, a hand-held microphone should be about a handspan from your mouth.  Stand-mounted or Lectern mics should be about 15”/400mm away from your mouth.  A microphone on a stand will typically be setup for voice reinforcement. Taking the microphone off its stand and useing it as a hand-held will result in excessively loud sound-levels. A good sound operator can help here. However, don’t assume they can read minds, so try to give them some warning what you intend to do.
  • Ensure your voice production is clear and controlled.  The microphone doesn’t make the sound for you – it reinforces the sound you make.  If the sound you make is muddy, mumbled and unclear, so will be the amplified sound.
  • Watch your dynamic control.  By all means express yourself dramatically – just stay within the bounds of the system capability. If all your drama only bursts your audience’s ear drums, they won’t “hear” anything else. In either sense of the word.
  • Watch you don’t move off orientation to the microphone. It’s fine to walk around if you are comfortable with that – so long as the microphone walks with you and stays properly oriented to your mouth.  (If you are able, use a wireless microphone such as a lavaliere clipon, developed specifically to address this issue. However, they still need care to setup and use.)  Some microphones are more tolerant than others, but just turning your head can make a big difference.

You speak to deliver a message – don’t let the technology become a distraction to that message.

Church Websites: Part One

What, Why & Wherefore

How can churches use websites effectively?

graph of survey results - the best way we could use improved church technology in our District would be ...;  How can churches use websites effectively?

In November last year, I ran a survey on Church Technology topics and received about 80 responses over a period of a couple of weeks.  As you can see from the graph, it seems like some of you want to find out about websites, so here we go.

What are websites?

Websites are fundamentally a collection of documents on a server running a program to use a set of defined technology protocols to make the documents available for display on a remote, but network connected, computer.  The motivation behind the original technology was to create an easier way to share academic research within the academic community and focused on text documents.  Over time, the enabling technologies have been expanded and evolved so that now, website technologies are what drives everything from online banking and online shopping to social media to remote control of your house air-conditioning and lighting.  Today, a “standard”, bread and butter website would use server-based software called a Content Management System (CMS) and build the site out of a collection of components that contain content and display that content in different ways.

Church websites

So, why have a church/parish/congregation website?  Like many things in the communications field, the first question is, “What are you trying to achieve?  What is that makes this a desirable objective for us to accomplish?”  Given that there is no truly free way to develop a website – at the very least someone will spend time, and time has a value, even if we don’t end up paying money for it.  We need to make sure that the resources we spend make us a return of the type we are looking for.  In my experience, there are three general types of things churches try to achieve in their websites, in combination or by themselves.  But whatever type suits your situation, remember, “If it’s worth doing, it’s worth doing well!”

  • Brochureware” site – I call this type “brochureware” because it is an online clone of the printed brochure some congregations have their greeters hand to new arrivals.  The objective is to give a summary of the congregation’s “Vital statistics” – the phone numbers, addresses (email, postal, physical), what groups meet and key contact people.  Often, congregations will try to go beyond the purely administrative information and try to paint a picture of the type of community the congregation is to help strangers viewing the website try to assess how well they would “fit” in that community.  The “Find a Church” feature on the methodist.org.nz website is well-suited to hosting sites of this type.  (Alec Utting is the webmaster for this site and would be happy to talk to you about getting your Parish page up to scratch.)  Given the research that indicates that something like 70% of people who walk through your door for the first time has already checked you out with Google, I think this type of site is a no-brainer.
  • Internal Admin site – This type of site is focused on communications between the parish and its members.  It provides access to things like rosters, prayer requests, meeting agendas and minutes etc.  The nature of the material means that usually some form of access control is required so that confidential information doesn’t get viewed by people who aren’t supposed to.  Often this type of site adds community building features to help facilitate and foster the relationship between there members.  Personally, my feeling is that unless you have very specific requirements, it would be easier and cheaper to set up a closed group on facebook or a similar platform.
  • Community site – This type of site reaches beyond one’s own members and tries to engage the people in one’s community.  To do this well is very resource intensive (in comparison to the other types), but has the most potential for working for good within one’s community, building a presence for the congregation and building a real role for the church within its community.

I’ve run out of space.  Obviously, I will have to write some follow-up articles in future issues.

Enabling Inclusion

Bringing Church to the people (or People to the church)

I believe it is fair to say that the original motivation for a lot of church sound systems was the capability to record services to cassette, which could then be distributed to the housebound, the ill and others who might be interested.  As a social mechanism for inclusion of community members who may otherwise be marginalised, it is a practice of considerable merit (although I suspect that you had to physically deliver a cassette tape in person might be a contributing contributor to this).  Cassette tapes have died the death of technological obsolescence, but there are still churches who effectively continue these principles with equivalent modern technologies.

So, it was of interest to me to come across a Facebook post from a person asking to for advice on how to use technology to flip this idea on its head.  Rather than asking how can we share what we do in worship with those who can’t be present; but instead, how can we assist those who can’t be present to contribute to and participate in what we do in worship.  So, this being a technology column, let’s look at some ways to do this.

Technologically, we can categorise suitable methods as audio-only vs audio-video, or as pre-recorded vs “live”.  There are many options available, but the solutions I indicate below are based on real situations and products I know work – this is not to suggest there are no other ways this can be done.  I’ve assumed that your playback location has a sound system built-in, and a projector or video display for video, but there is no requirement for this – there are portable solutions available at low or moderate cost if required, provided care is taken to consider the requirements inherent in the size of the venue.

Pre-recorded audio-only and audio-video

This is potentially the simplest way to start including others.  There are many devices now to record digital audio – a smartphone usually being the easiest to get hold of.  Place the device on a solid surface or tripod if you can in front of the person speaking – resist the urge to hold it in your hand – and use a recording app.  The built-in one will usually be fine, but there are lots of options, both paid and free.  For video recordings, make sure the subject is well lit, particularly the face.  Place the camera lens at the same level as the subject’s face and remember that for speech, close-ups are more effective than long shots (especially when relying on built-in microphones).  Sometimes, the easiest way to capture audio for audio-only play back is to make a video recording.

Having made your recording, the recording file needs to be transferred to the playback device, usually a computer.  If you must remove that unfortunate moment when the fire engine went past, use editing software to trim to suit.  Audacity is a good free program for this for audio, and I tend to use VLC for video.  I also use Camtasia but it comes at a cost.  Also, NCH have a range of good audio and video programs on a free-to-try basis, with very reasonable pricing if you decide you like it.  Depending on your final playback platform you may need to convert the file from the recorded format to a format compatible for your playback system – most editing programs allow at least some degree of format conversion, but there are also dedicated conversion programs available.  Often, embedding the audio or video in a power-point slide is the easiest way

Live audio-only and audio-video

The principles of capturing a recording is fundamentally the same as for Pre-recorded – you just won’t have the opportunity to do any editing or format conversion – get it right first time!  You will need to have some form of reasonable network connection to your venue though.  Packages include Skype or Zoom.  Livestream.com (as used for recent conferences) is also a moderately priced option.  Essentially, you use the solution to “make a phone call” from the reader to the venue.  This can be answered directly, but a slightly more elegant solution would be to provide a video-switcher at the venue so that the call can be placed and/or answered and everything made ready before the call is displayed to the audience.

I’d love to hear about what you are doing.

Resources